# Unit testing with Vitest: Real-World Scenarios and Advanced Approaches
- Author: Aljaz Oblonsek
- Published: 2023-07-23
- Canonical URL: https://portfolio.oblonsek.si/posts/unit-testing-with-vitest-real-world-scenarios-and-advanced-approaches
Discover the power of unit testing with Vitest as we delve into real-world scenarios and explore advanced approaches to elevate your React application's testing capabilities.
---
As promised in the previous blog post, we will dive into vitest's advanced techniques today! This post will cover everything from mocking to using fake timers and writing parameterized tests.
Pro Tip: If you are already familiar with Jest but new to Vitest, you can leverage your knowledge of Jest and Google for solutions in Jest, as Vitest has a very similar API to Jest. This way, you can find Jest solutions and adapt them for your Vitest use case to streamline your testing process.
_Note: As always, there are multiple approaches to achieve the same thing, and you must research which one works best for you._
## Real World Example 1: Testing `useDebouncedValue` Hook
Let's start by creating a new file `useDebouncedValue.ts` and adding the following code to it:
```ts
import { useEffect, useState } from 'react';
export const useDebouncedValue = (value: T, delay = 500): T => {
const [debouncedValue, setDebouncedValue] = useState(value);
useEffect(() => {
const timer = setTimeout(() => setDebouncedValue(value), delay);
return () => {
clearTimeout(timer);
};
}, [value, delay]);
return debouncedValue;
};
```
Explanation of the code:
The `useDebouncedValue` hook takes a `value` and an optional `delay` parameter, defaulting to 500ms. It returns a `debouncedValue` state variable that gets updated after the specified delay whenever the `value` changes. It uses `setTimeout` to handle the debounce logic, delaying the update of `debouncedValue` until the specified `delay` has passed.
Before we start to write tests, let's take a closer look at the `useDebouncedValue` hook. As you can see, it uses `setTimeout` function to handle the debounce logic. However, this is not ideal for unit tests, as we want them to be predictable and reliable. `setTimeout` relies on real time, making it less suitable for testing. Here, `vitest` comes to the rescue with its fake timers mock. This mock replaces real timers like `setTimeout` and `setInterval` with mock implementations, allowing us to use utilities like advanceTimersByTime to control the timers during tests.
Now, let's proceed with the two ways of testing this hook:
### Using `renderHook` Helper from React Testing Library
Let's create a new file and start writing the tests:
```ts
import { useState } from 'react';
import { describe, expect, it, vitest } from 'vitest';
import { act, renderHook } from '@testing-library/react';
import { useDebouncedValue } from './useDebouncedValue';
describe('useDebouncedValue', () => {
beforeEach(() => {
vitest.useFakeTimers();
});
afterEach(() => {
vitest.useRealTimers();
});
it('should return the initial value', () => {
const initialValue = 'Hello';
const { result } = renderHook(() => useDebouncedValue(initialValue));
expect(result.current).toBe(initialValue);
});
});
```
The first test is straightforward - we simply test if the input value provided is the same as the output value.
Now, let's add another test case:
```ts
it('should use default delay if not provided', () => {
const { result: useStateHook } = renderHook(() => useState('John'));
const { result: useDebouncedValueHook, rerender: rerenderUseDebouncedValueHook } = renderHook(
() => useDebouncedValue(useStateHook.current[0])
);
expect(useDebouncedValueHook.current).toBe('John');
act(() => {
useStateHook.current[1]('Mike');
rerenderUseDebouncedValueHook();
});
expect(useDebouncedValueHook.current).toBe('John');
act(() => {
vitest.advanceTimersByTime(400);
rerenderUseDebouncedValueHook();
});
expect(useDebouncedValueHook.current).toBe('John');
act(() => {
vitest.advanceTimersByTime(100);
rerenderUseDebouncedValueHook();
});
expect(useDebouncedValueHook.current).toBe('Mike');
});
```
In this test case, we first render two hooks: an `useState` hook that is responsible for holding our `name`, and the `useDebouncedValue` hook that holds the value of our `useState` hook, which we want to debounce.
This case is a bit more complicated. First, we use `setName` (`useStateHook.current[1]('Mike');`) to update our `name`, and then we have to re-render the `useDebouncedValue` hook. After that, we assert to make sure our `useDebouncedValue` hook still holds the same value as before.
Then, we advance the timers using `vitest.advanceTimersByTime` for **400ms**, re-render the `useDebounceValue` hook, and assert again. The value should still be the same since the default delay is **500ms**.
For the third time, we advance the timers by **100ms**, which makes it **500ms** in total. We can now assert the new value as it should be debounced by now.
_You can read more about the `act` function here._
Finally, let's add the last test case:
```ts
it('should use provided delay', () => {
const { result: useStateHook } = renderHook(() => useState('John'));
const { result: useDebouncedValueHook, rerender: rerenderUseDebouncedValueHook } = renderHook(
() => useDebouncedValue(useStateHook.current[0], 1000)
);
expect(useDebouncedValueHook.current).toBe('John');
act(() => {
useStateHook.current[1]('Mike');
rerenderUseDebouncedValueHook();
});
expect(useDebouncedValueHook.current).toBe('John');
act(() => {
vitest.advanceTimersByTime(600);
rerenderUseDebouncedValueHook();
});
expect(useDebouncedValueHook.current).toBe('John');
act(() => {
vitest.advanceTimersByTime(400);
rerenderUseDebouncedValueHook();
});
expect(useDebouncedValueHook.current).toBe('Mike');
});
```
In this test case, we simply test to ensure that `useDebouncedValue` respects the custom `delay` if we pass it as a parameter. I won't go into detail here since it's quite similar to the previous test case.
### Using `render` from React Testing Library with a Wrapper Component
Let's take a look at the code below:
```ts
import { useState } from 'react';
import { describe, expect, it, vitest } from 'vitest';
import { cleanup, fireEvent, render, act } from '@testing-library/react';
import { useDebouncedValue } from './useDebouncedValue';
const UseDebouncedValueWrapper = ({ debounceDelay }: { debounceDelay?: number }) => {
const [name, setName] = useState('John');
const debouncedName = useDebouncedValue(name, debounceDelay);
return (
{debouncedName}
);
};
describe('useDebouncedValue', () => {
beforeEach(() => {
vitest.useFakeTimers();
cleanup();
});
afterEach(() => {
vitest.useRealTimers();
});
it('should return the initial value', () => {
const { getByTestId } = render();
expect(getByTestId('debounced-name-value').textContent).toBe('John');
});
it('should use default delay if not provided', () => {
const { getByTestId } = render();
fireEvent.click(getByTestId('change-name-to-mike-button'));
expect(getByTestId('debounced-name-value').textContent).toBe('John');
act(() => {
vitest.advanceTimersByTime(400);
});
// Default delay is 500ms, so the value should still be John
expect(getByTestId('debounced-name-value').textContent).toBe('John');
act(() => {
vitest.advanceTimersByTime(100);
});
expect(getByTestId('debounced-name-value').textContent).toBe('Mike');
});
it('should use provided delay', () => {
const { getByTestId } = render();
fireEvent.click(getByTestId('change-name-to-mike-button'));
expect(getByTestId('debounced-name-value').textContent).toBe('John');
act(() => {
vitest.advanceTimersByTime(600);
});
// Delay is now 1000ms, so the value should still be John
expect(getByTestId('debounced-name-value').textContent).toBe('John');
act(() => {
vitest.advanceTimersByTime(400);
});
expect(getByTestId('debounced-name-value').textContent).toBe('Mike');
});
});
```
The code for using a wrapper component is quite different from using the `renderHook` helper. Here, we create a new component called `UseDebouncedValueWrapper` that uses two hooks inside it: the `useState` hook, responsible for holding our `name`, and the `useDebouncedValue` hook, which holds the value of our `name` that we want to debounce. We also render a button that changes our `name` from `John` to `Mike` when clicked, and a `div` that displays the `debouncedName`. Each element has a `data-testid` attribute for easier access in tests.
We use the `getByTestId` function to get the actual elements and then expect their `textContent` to match our expected value.
### Conclusion
In my opinion, both solutions are viable. Each has its pros and cons - it is up to you to decide which one provides the most value to your tests. For this specific use case, the second example (using `render` with a wrapper component) is the way to go in my opinion, as it closely resembles how the `useDebouncedValue` hook will actually be used.
## Real World Example 2: Testing `apiFetch` function - a custom `fetch` wrapper
`apiFetch` is a custom function that wraps the JavaScript `fetch` API and extends its functionality by adding a base URL, constructing the API URL, and automatically adding a JWT from local storage to the request headers.
Let's create a new file `apiFetch.ts` and paste the following code into it:
```ts
// This would probably get taken from environment
export const API_BASE_URL = 'http://localhost:8000';
const apiUrl = `${API_BASE_URL}/api`;
interface ApiFetchRequestInit extends Omit {
headers?: Record;
}
export const apiFetch = async (input: RequestInfo | URL, init?: ApiFetchRequestInit) => {
try {
let headers: Record = {};
if (init && init.headers) {
headers = { ...init.headers };
}
const accessToken = localStorage.getItem('accessToken');
if (accessToken) {
headers.Authorization = `Bearer ${accessToken}`;
}
const response = await fetch(`${apiUrl}${input}`, { ...init, headers });
return response;
} catch (error: unknown) {
console.warn('An unknown error occurred: ', String(error));
throw error;
}
};
```
The `apiFetch` function takes two parameters - `input` (the request URL) and `init` (optional request options like headers). It constructs the full API URL by appending the `input` to the `apiUrl` which is derived from the `API_BASE_URL`. It then adds the JWT token to the request headers if it is available in `localStorage`, making it easier to authorize API requests.
Before we write tests for our `apiFetch` function, we need to install a new dev dependency that allows us to mock the `fetch` function:
```bash
npm install --save-dev vitest-fetch-mock
```
Now let's create a new file `apiFetch.test.ts` and add the following code to it:
```ts
import { describe, it, SpyInstance, vi, expect } from 'vitest';
import createFetchMock from 'vitest-fetch-mock';
import { API_BASE_URL, apiFetch } from './apiFetch';
const fetchMocker = createFetchMock(vi);
describe('apiFetch', () => {
let getItemSpy: SpyInstance<[key: string], string | null>;
beforeEach(() => {
getItemSpy = vi.spyOn(Storage.prototype, 'getItem');
fetchMocker.enableMocks();
});
afterEach(() => {
getItemSpy.mockRestore();
fetchMocker.disableMocks();
});
});
```
In this test file, we first create a new instance of `fetchMocker` provided by the vitest-fetch-mock package.
Next, we start defining our tests. We create a variable `getItemSpy` that will spy on the `localStorage.getItem` function, enabling us to control and track how tests access `localStorage`.
We then define `beforeEach`, where we set up the `getItemSpy` and enable `fetch` mocks using our `fetchMocker` instance. In `afterEach`, we restore the original functionality of `getItemSpy` and disable `fetch` mocks. These setup and cleanup functions will run before and after each test case.
Let's add our first test case:
```ts
it('should correctly setup apiUrl based on base url and provided request url', async () => {
await apiFetch('/test');
expect(fetch).toBeCalledWith(`${API_BASE_URL}/api/test`, { headers: {} });
});
```
In this test case, we call the `apiFetch` function with the `/test` string as the request URL. We then assert that the `apiFetch` wrapper has called the JavaScript `fetch` function with the correctly set up URL (in this case, the full URL should be `http://localhost:8000/api/test`). We also verify that `fetch` was called without any headers, as we have not set up `getItemSpy` to return anything yet, and we did not pass any headers to the `apiFetch` call.
Next test case:
````ts
it('should not set jwt to headers if it cannot get it from localStorage', async () => {
getItemSpy.mockReturnValueOnce(null);
await apiFetch('/test');
expect(getItemSpy).toHaveBeenCalledWith('accessToken');
expect(fetch).toBeCalledWith(`${API_BASE_URL}/api/test`, { headers: {} });
});```
````
In this test case, we set up the `getItemSpy` to return `null`. We then assert that `localStorage.getItem` was called with the string `'accessToken'`, which represents an attempt to retrieve the JWT from local storage (as instructed in the `apiFetch` function). We also verify that `fetch` was called without any headers, as the JWT is `null`.
Next test case:
```ts
it('should set jwt to headers if it can get it from localStorage', async () => {
getItemSpy.mockReturnValueOnce('myJwtToken');
await apiFetch('/test');
expect(getItemSpy).toHaveBeenCalledWith('accessToken');
expect(fetch).toBeCalledWith(`${API_BASE_URL}/api/test`, {
headers: { Authorization: 'Bearer myJwtToken' },
});
});
```
In this test case, we instruct the `getItemSpy` to return the string `'myJwtToken'`. We then assert that `localStorage.getItem` was called and that `fetch` was called with the correct header, containing the JWT.
And the last test case:
```ts
it('should correctly join headers if any are provided', async () => {
getItemSpy.mockReturnValueOnce('myJwtToken');
await apiFetch('/test', { headers: { 'Content-Type': 'application/json' } });
expect(getItemSpy).toHaveBeenCalledWith('accessToken');
expect(fetch).toBeCalledWith(`${API_BASE_URL}/api/test`, {
headers: { Authorization: 'Bearer myJwtToken', 'Content-Type': 'application/json' },
});
});
```
In this final test case, we pass an additional header to the `apiFetch` function. We then assert that `localStorage.getItem` was called, and we also verify that `fetch` was called with both the `Authorization` header containing the JWT and the additional header provided.
Please note that this is a simplified version of the `apiFetch` function. For a more thorough approach, further aspects like JWT validation, JWT refresh mechanisms, and robust error handling would be considered.
## Real World Example 3: Testing `getTotalCartPrice` function
Let's create a new file `getTotalCartPrice.ts` and paste the following code into it:
```ts
export type Product = {
name: string;
price: number;
};
export type CartItem = {
product: Product;
amount: number;
};
export const getTotalCartPrice = (cartItems: CartItem[]): number => {
return cartItems.reduce((totalCartPrice, currentCartItem) => {
const currentCartItemPrice = currentCartItem.product.price * currentCartItem.amount;
return totalCartPrice + currentCartItemPrice;
}, 0);
};
```
The code provides type definitions for `Product` and `CartItem`. The `getTotalCartPrice` function accepts an array of `CartItem` objects and uses the `reduce` method to iterate through each cart item and calculate the total price by multiplying the `price` of the `Product` with its corresponding `amount`. The `reduce` method starts with an initial value of `0`, which is the total price initially, and accumulates the individual cart item prices.
Now let's write tests for this function using parameterized tests. Parametrized tests are an essential and powerful feature that allows us to run the same test with different sets of input data. For this purpose, we will utilize vitest's test/it.each feature.
Create a new file `getTotalPrice.test.ts` and add the following code:
```ts
import { describe, expect, it } from 'vitest';
import { CartItem, Product, getTotalCartPrice } from './getTotalCartPrice';
const cola: Product = {
name: 'Cola',
price: 50,
};
const pepsi: Product = {
name: 'Pepsi',
price: 20,
};
const bread: Product = {
name: 'Bread',
price: 70,
};
const cart1: CartItem[] = [{ product: cola, amount: 2 }];
const cart1TotalPrice = 100;
const cart2: CartItem[] = [
{ product: pepsi, amount: 3 },
{ product: bread, amount: 1 },
];
const cart2TotalPrice = 130;
const cart3: CartItem[] = [{ product: bread, amount: 3 }];
const cart3TotalPrice = 210;
describe('getTotalCartPrice', () => {
it('should return 0 if empty array is provided', () => {
const totalCartPrice = getTotalCartPrice([]);
expect(totalCartPrice).toBe(0);
});
});
```
In this test file, we import the necessary functions and type definitions. Then, we define a few products (`cola`, `pepsi`, `bread`) and their corresponding cart configurations (`cart1`, `cart2`, `cart3`). These cart configurations represent different combinations of products and their amounts.
The first test case (`'should return 0 if an empty array is provided'`) is straightforward. We simply pass an empty array to the `getTotalCartPrice` function and assert that it returns `0`, as there are no items in the cart.
Now, let's add the parameterized test:
```ts
it.each([
['Cart 1', cart1, cart1TotalPrice],
['Cart 2', cart2, cart2TotalPrice],
['Cart 3', cart3, cart3TotalPrice],
])('[%s] should correctly calculate total cart price', (_, cartItems, result) => {
const totalCartPrice = getTotalCartPrice(cartItems);
expect(totalCartPrice).toBe(result);
});
```
Here, we use `it.each` to create a parameterized test. It allows us to test the `getTotalCartPrice` function with different sets of input data (`cartItems`) and their corresponding expected results (`result`).
We define an array of test cases, where each test case is an array containing the name of the cart configuration (e.g., `'Cart 1'`, `'Cart 2'`) as the first element, the cart items (e.g., `cart1`, `cart2`) as the second element, and the expected total price (`cart1TotalPrice`, `cart2TotalPrice`) as the third element.
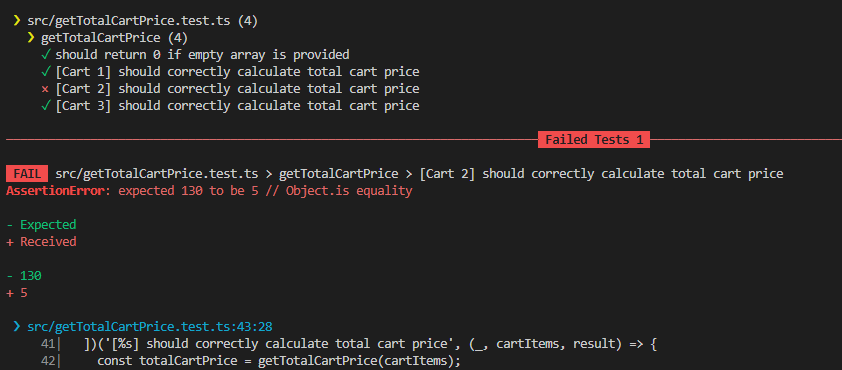
The test function then takes these values as parameters and runs the test for each test case. The test name (`'[%s] should correctly calculate the total cart price'`) is formatted using the first element of each test case array (e.g., `'[Cart 1] should correctly calculate the total cart price'`, `'[Cart 2] should correctly calculate the total cart price'`). It is just used to easily understand which test fails in case of failure - we could also fully remove the first element if such details are not needed.
Inside the test function, we calculate the total cart price using `getTotalCartPrice(cartItems)` and compare it to the expected result using `expect(totalCartPrice).toBe(result)`.
By using parameterized tests, we can efficiently test the `getTotalCartPrice` function with multiple scenarios, reducing code duplication and improving the overall test suite readability.
Consider the first test (`'should return 0 if empty array is provided'`). It could also be included within the parametrized test. Although I agree with that approach, and it should work perfectly fine, I believe adding a separate test for passing in an empty array will provide more value while still maintaining clear code
## Conclusion
In conclusion, unit testing is an essential aspect of building robust and reliable React applications. Vitest provides powerful features that simplify testing and enable you to tackle real-world scenarios with ease.
Remember, the testing approaches presented in this post are just examples, and there might be other ways to test the same functionality. The key is to find the best approach that suits your specific use case and ensures the reliability of your codebase.
**References:**
- Vitest Documentation
- React Testing Library Documentation
 Inside the test function, we calculate the total cart price using `getTotalCartPrice(cartItems)` and compare it to the expected result using `expect(totalCartPrice).toBe(result)`.
By using parameterized tests, we can efficiently test the `getTotalCartPrice` function with multiple scenarios, reducing code duplication and improving the overall test suite readability.
Consider the first test (`'should return 0 if empty array is provided'`). It could also be included within the parametrized test. Although I agree with that approach, and it should work perfectly fine, I believe adding a separate test for passing in an empty array will provide more value while still maintaining clear code
## Conclusion
In conclusion, unit testing is an essential aspect of building robust and reliable React applications. Vitest provides powerful features that simplify testing and enable you to tackle real-world scenarios with ease.
Remember, the testing approaches presented in this post are just examples, and there might be other ways to test the same functionality. The key is to find the best approach that suits your specific use case and ensures the reliability of your codebase.
Inside the test function, we calculate the total cart price using `getTotalCartPrice(cartItems)` and compare it to the expected result using `expect(totalCartPrice).toBe(result)`.
By using parameterized tests, we can efficiently test the `getTotalCartPrice` function with multiple scenarios, reducing code duplication and improving the overall test suite readability.
Consider the first test (`'should return 0 if empty array is provided'`). It could also be included within the parametrized test. Although I agree with that approach, and it should work perfectly fine, I believe adding a separate test for passing in an empty array will provide more value while still maintaining clear code
## Conclusion
In conclusion, unit testing is an essential aspect of building robust and reliable React applications. Vitest provides powerful features that simplify testing and enable you to tackle real-world scenarios with ease.
Remember, the testing approaches presented in this post are just examples, and there might be other ways to test the same functionality. The key is to find the best approach that suits your specific use case and ensures the reliability of your codebase.