# NestJS Auto-Caching: Peeking Under The Hood
- Author: Aljaz Oblonsek
- Published: 2023-12-03
- Canonical URL: https://portfolio.oblonsek.si/posts/nestjs-auto-caching-peeking-under-the-hood
Discover the secrets behind NestJS Auto-Caching, uncovering the magic that makes automatic response caching tick.
---
You've delved into the NestJS documentation on caching and found the Auto-caching responses section impressive. Just adding `@UseInterceptors(CacheInterceptor)` above your route or controller magically enables caching for GET endpoints. But what if issues arise and you're unsure why? Or perhaps you're just curious about the mysterious workings under the hood. Let's explore what exactly happens when you add the `CacheInterceptor`.
Consider the following controller code:
```ts
@Controller('pets')
export class PetsController {
constructor(private petsService: PetsService) {}
@UseInterceptors(CacheInterceptor)
@Get()
getAllPets(): string[] {
return this.petsService.getAllPets();
}
}
```
This `PetsController` has a single GET method that retrieves all pets from the `petsService` and returns them. Notice the `@UseInterceptors(CacheInterceptor)` to enable auto-caching of responses on this endpoint.
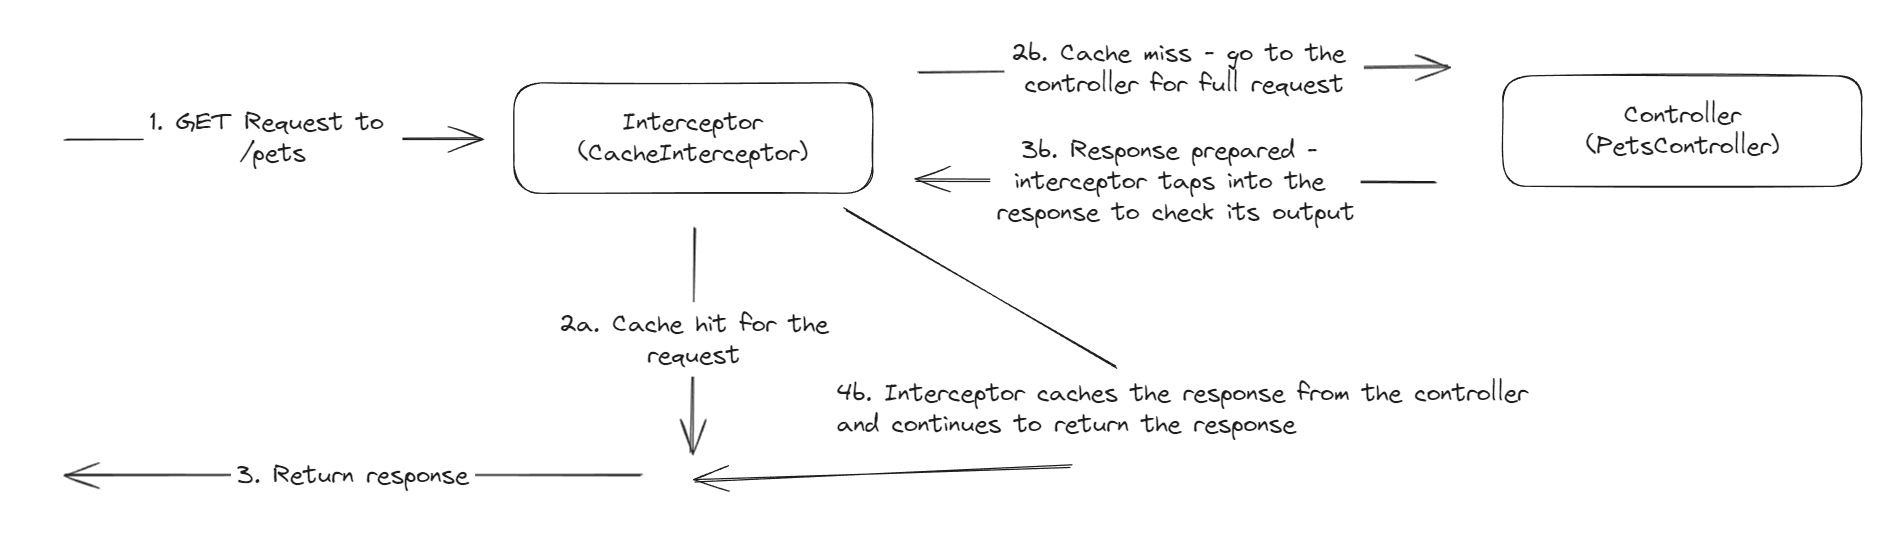
Now, let's break down the process with the help of the diagram below:
 ### Step 1: Get the Cache Key
1. Attempt to retrieve the cache key provided by the developer.
- NestJS offers a `CacheKey` decorator for this purpose.
```ts
@CacheKey('get-pets')
@UseInterceptors(CacheInterceptor)
@Get()
getAllPets(): string[] {
return this.petsService.getAllPets();
}
```
2. If the developer-provided cache key is found, the function immediately returns it and proceeds to **Step 2**.
3. If the developer-provided cache key is not found, the interceptor checks if the request is cacheable (by default, only `GET` method is allowed). If the method is anything other than `GET`, the function returns `undefined`, halting the caching process.
4. If the method is GET and the request is cacheable, NestJS generates a cache key based on the URL. For example, `http://localhost:3000/pets` results in a cache key of `/pets`, while `http://localhost:3000/pets?search=test` yields a cache key of `/pets?search=test`.
### Step 2: Continuing the Cache Process if Key is Found
1. Retrieve the value from the cache datastore using the obtained key.
2. If the value is not `null` or `undefined`, the interceptor returns a response with the received value (step `2a` in the diagram).
3. If the value is `null` or `undefined`, indicating a cache miss (step `2b` in the diagram), the interceptor taps into the handle observable method, searching for the response and setting that response in the cache (step `4b` in the diagram).
_Note: Caching does not occur if the response is of type `StreamableFile`._
That's it. If you wish to explore how it works yourself, check out the source code of the `CacheInterceptor`.
### Step 1: Get the Cache Key
1. Attempt to retrieve the cache key provided by the developer.
- NestJS offers a `CacheKey` decorator for this purpose.
```ts
@CacheKey('get-pets')
@UseInterceptors(CacheInterceptor)
@Get()
getAllPets(): string[] {
return this.petsService.getAllPets();
}
```
2. If the developer-provided cache key is found, the function immediately returns it and proceeds to **Step 2**.
3. If the developer-provided cache key is not found, the interceptor checks if the request is cacheable (by default, only `GET` method is allowed). If the method is anything other than `GET`, the function returns `undefined`, halting the caching process.
4. If the method is GET and the request is cacheable, NestJS generates a cache key based on the URL. For example, `http://localhost:3000/pets` results in a cache key of `/pets`, while `http://localhost:3000/pets?search=test` yields a cache key of `/pets?search=test`.
### Step 2: Continuing the Cache Process if Key is Found
1. Retrieve the value from the cache datastore using the obtained key.
2. If the value is not `null` or `undefined`, the interceptor returns a response with the received value (step `2a` in the diagram).
3. If the value is `null` or `undefined`, indicating a cache miss (step `2b` in the diagram), the interceptor taps into the handle observable method, searching for the response and setting that response in the cache (step `4b` in the diagram).
_Note: Caching does not occur if the response is of type `StreamableFile`._
That's it. If you wish to explore how it works yourself, check out the source code of the `CacheInterceptor`.
**References:**
- NestJS Documentation on Caching
- CacheInterceptor Source Code