
🚀 Interested in Next.js 13's App Directory and React Server Components (RSC)? Most tutorials focus on building full-stack apps within Next.js accessing the database directly in RSCs, but what if you already have a separate API?
✨ As you try migrating your SPA to Next.js App Directory to try out the shinny new features, you'll encounter challenges when implementing the traditional "SPA" refresh token flow with RSCs. This article explores how to make it work.
🧐 Please note that this is a Proof of Concept and not intended for production use. It's an experimental workaround to leverage Next.js RSCs.
Prerequisites
Before we embark on this journey, it's essential to have a solid grasp of the following:
- React
- Next.js 13 (including the App Directory, React Server Components, and Next.js API routes)
- JWTs and JWT Authentication, especially understanding the Refresh Flow on both the frontend and backend
If you'd like to dive straight into the code, you can find it in this repository link.
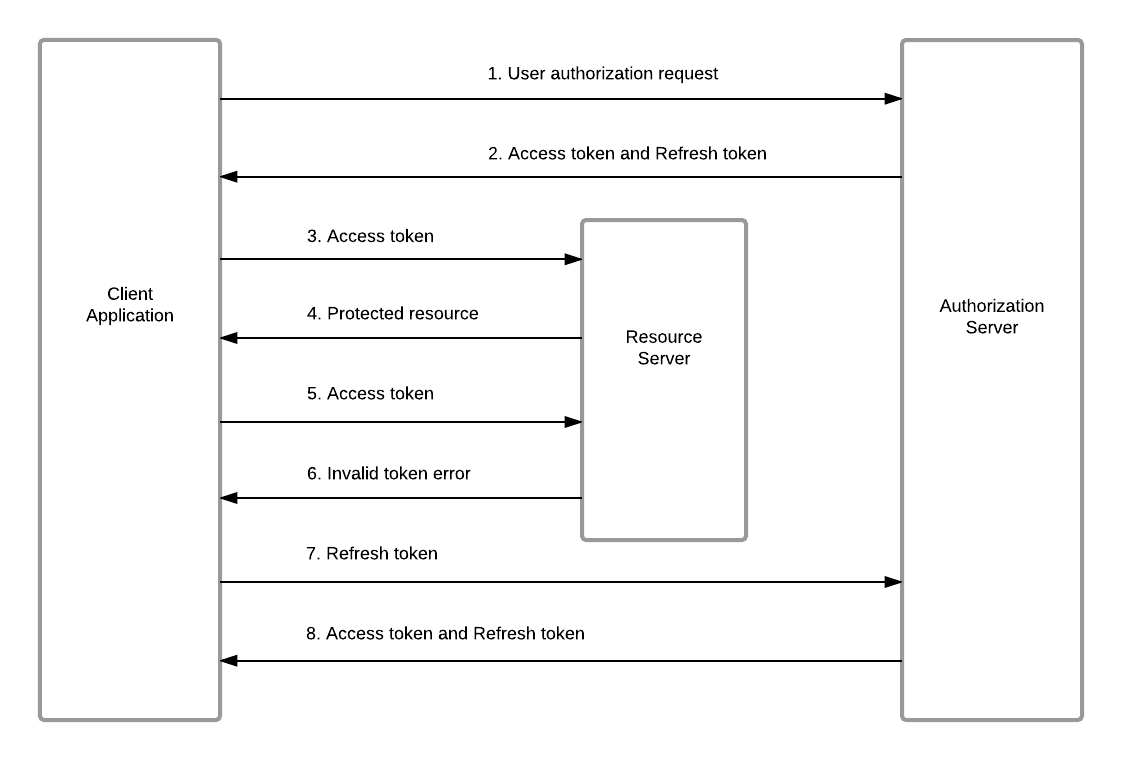
What is the "Traditional SPA" Refresh Token Flow?
To begin, let's demystify what I consider the "traditional SPA" refresh token flow. Here's a concise overview:
 Source: is.docs.wso2.com
- Client authenticates by sending credentials to the login endpoint.
- Successful login results in access and refresh tokens.
- The access token is used to send requests to protected endpoints.
- The backend API verifies the access token and responds with data.
- After some time, the access token expires, and a request to a protected endpoint returns a 401 status, indicating unauthorized access.
- To refresh the token, a request is sent to the refresh endpoint with both access and refresh tokens.
- The backend API validates the tokens and issues new access and refresh tokens.
- With the new access token, client can access protected endpoints again.
Visualizing the Token Rotation Flow between React SPA and an API
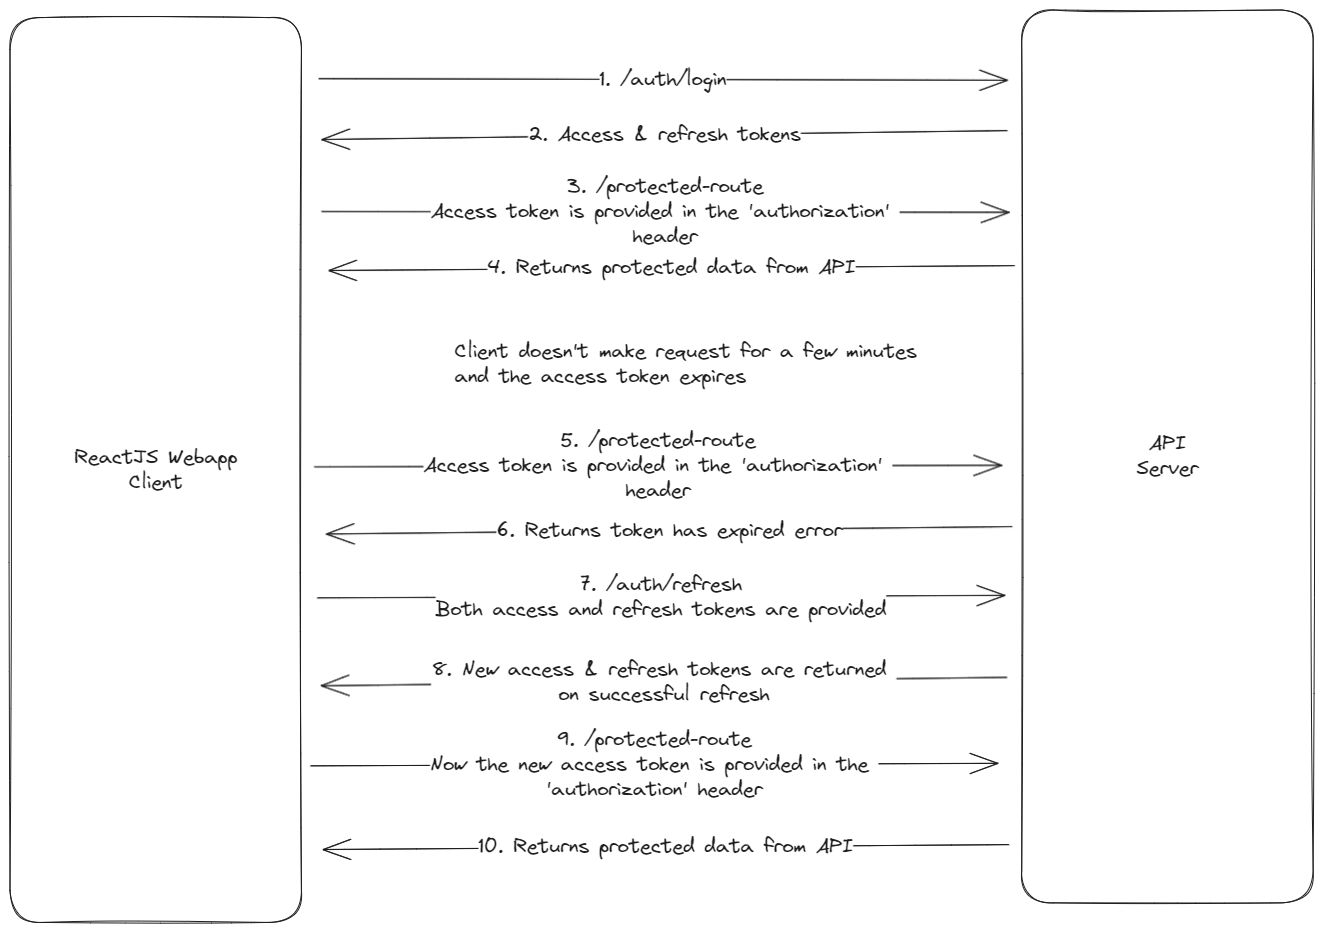
If you've worked with React SPAs, you've probably seen this diagram before. You've got Axios with interceptors keeping an eye on server responses, looking for 401 errors. When a 401 error pops up, the interceptors swing into action, refreshing tokens, and re-running the original request. Moreover, the tokens are typically stored in local storage for convenience or in HTTP-only cookies (note that if tokens are stored in HTTP-only cookies, the diagram may differ slightly).
Nonetheless, the landscape of React Server Components (RSC) presents a different challenge. We will now delve into why this well-established approach may require adaptation to work with the world of RSC.
Token Rotation in Next.js RSC
Take a close look at the following diagram, where the flow is illustrated step by step:

You'll notice that this approach differs somewhat from the traditional Single Page Application (SPA) method. When we make a call to the login endpoint, we don't directly access our separate API. Instead, our Next.js API serves as a proxy, forwarding our request to the backend. This setup allows us to store the tokens in a cookie, a crucial step since Next.js will require them in the subsequent RSC. For more details on handling cookies in the Next.js app directory, check out the Next.js documentation on cookies.
As the user later navigates to a "protected" RSC, which relies on the presence of tokens in a cookie, a request is made to our separate API to fetch some protected data. Because all of this occurs on the server, sending the access token from the client to the server is not feasible. Thus, we store the tokens in a cookie earlier in the process. In the RSC, we retrieve the tokens from the cookie, make a request to our backend with the access token, retrieve the data, and allow Next.js to work its magic in rendering the component.
After a few minutes, suppose the user navigates to another "protected" RSC, and the Next.js server sends a request to the separate API. In this scenario, the API responds with an error indicating that the token has expired. Next.js then calls the /auth/refresh route of our separate API to refresh the tokens and subsequently reissues the original request with the new access token. After this, the protected data is obtained from the API, and Next.js takes care of rendering the component. The interesting part here is that, if you inspect the network traffic in your browser's developer tools, you won't see any of these requests made to our separate API because everything is handled on the server within Next.js.
However, if you refresh your Next.js app on the same page, you'll encounter an error. This occurs because the Next.js RSC attempts to refresh the tokens once more. Why is that? We didn't set the new tokens in the cookies. Why not? Well, Next.js 13 doesn't allow us to set cookies in RSC directly. The cookies().set() function can only be called in Server Actions or Route Handlers. You can find more information on this in the Next.js documentation on cookie handling. Let's explore a "hacky" workaround to address this issue.
A "Hacky" Workaround for Updating Cookies with New Tokens
Most of the diagram remains unchanged, but it's essential to pay close attention to steps 16 to 18.
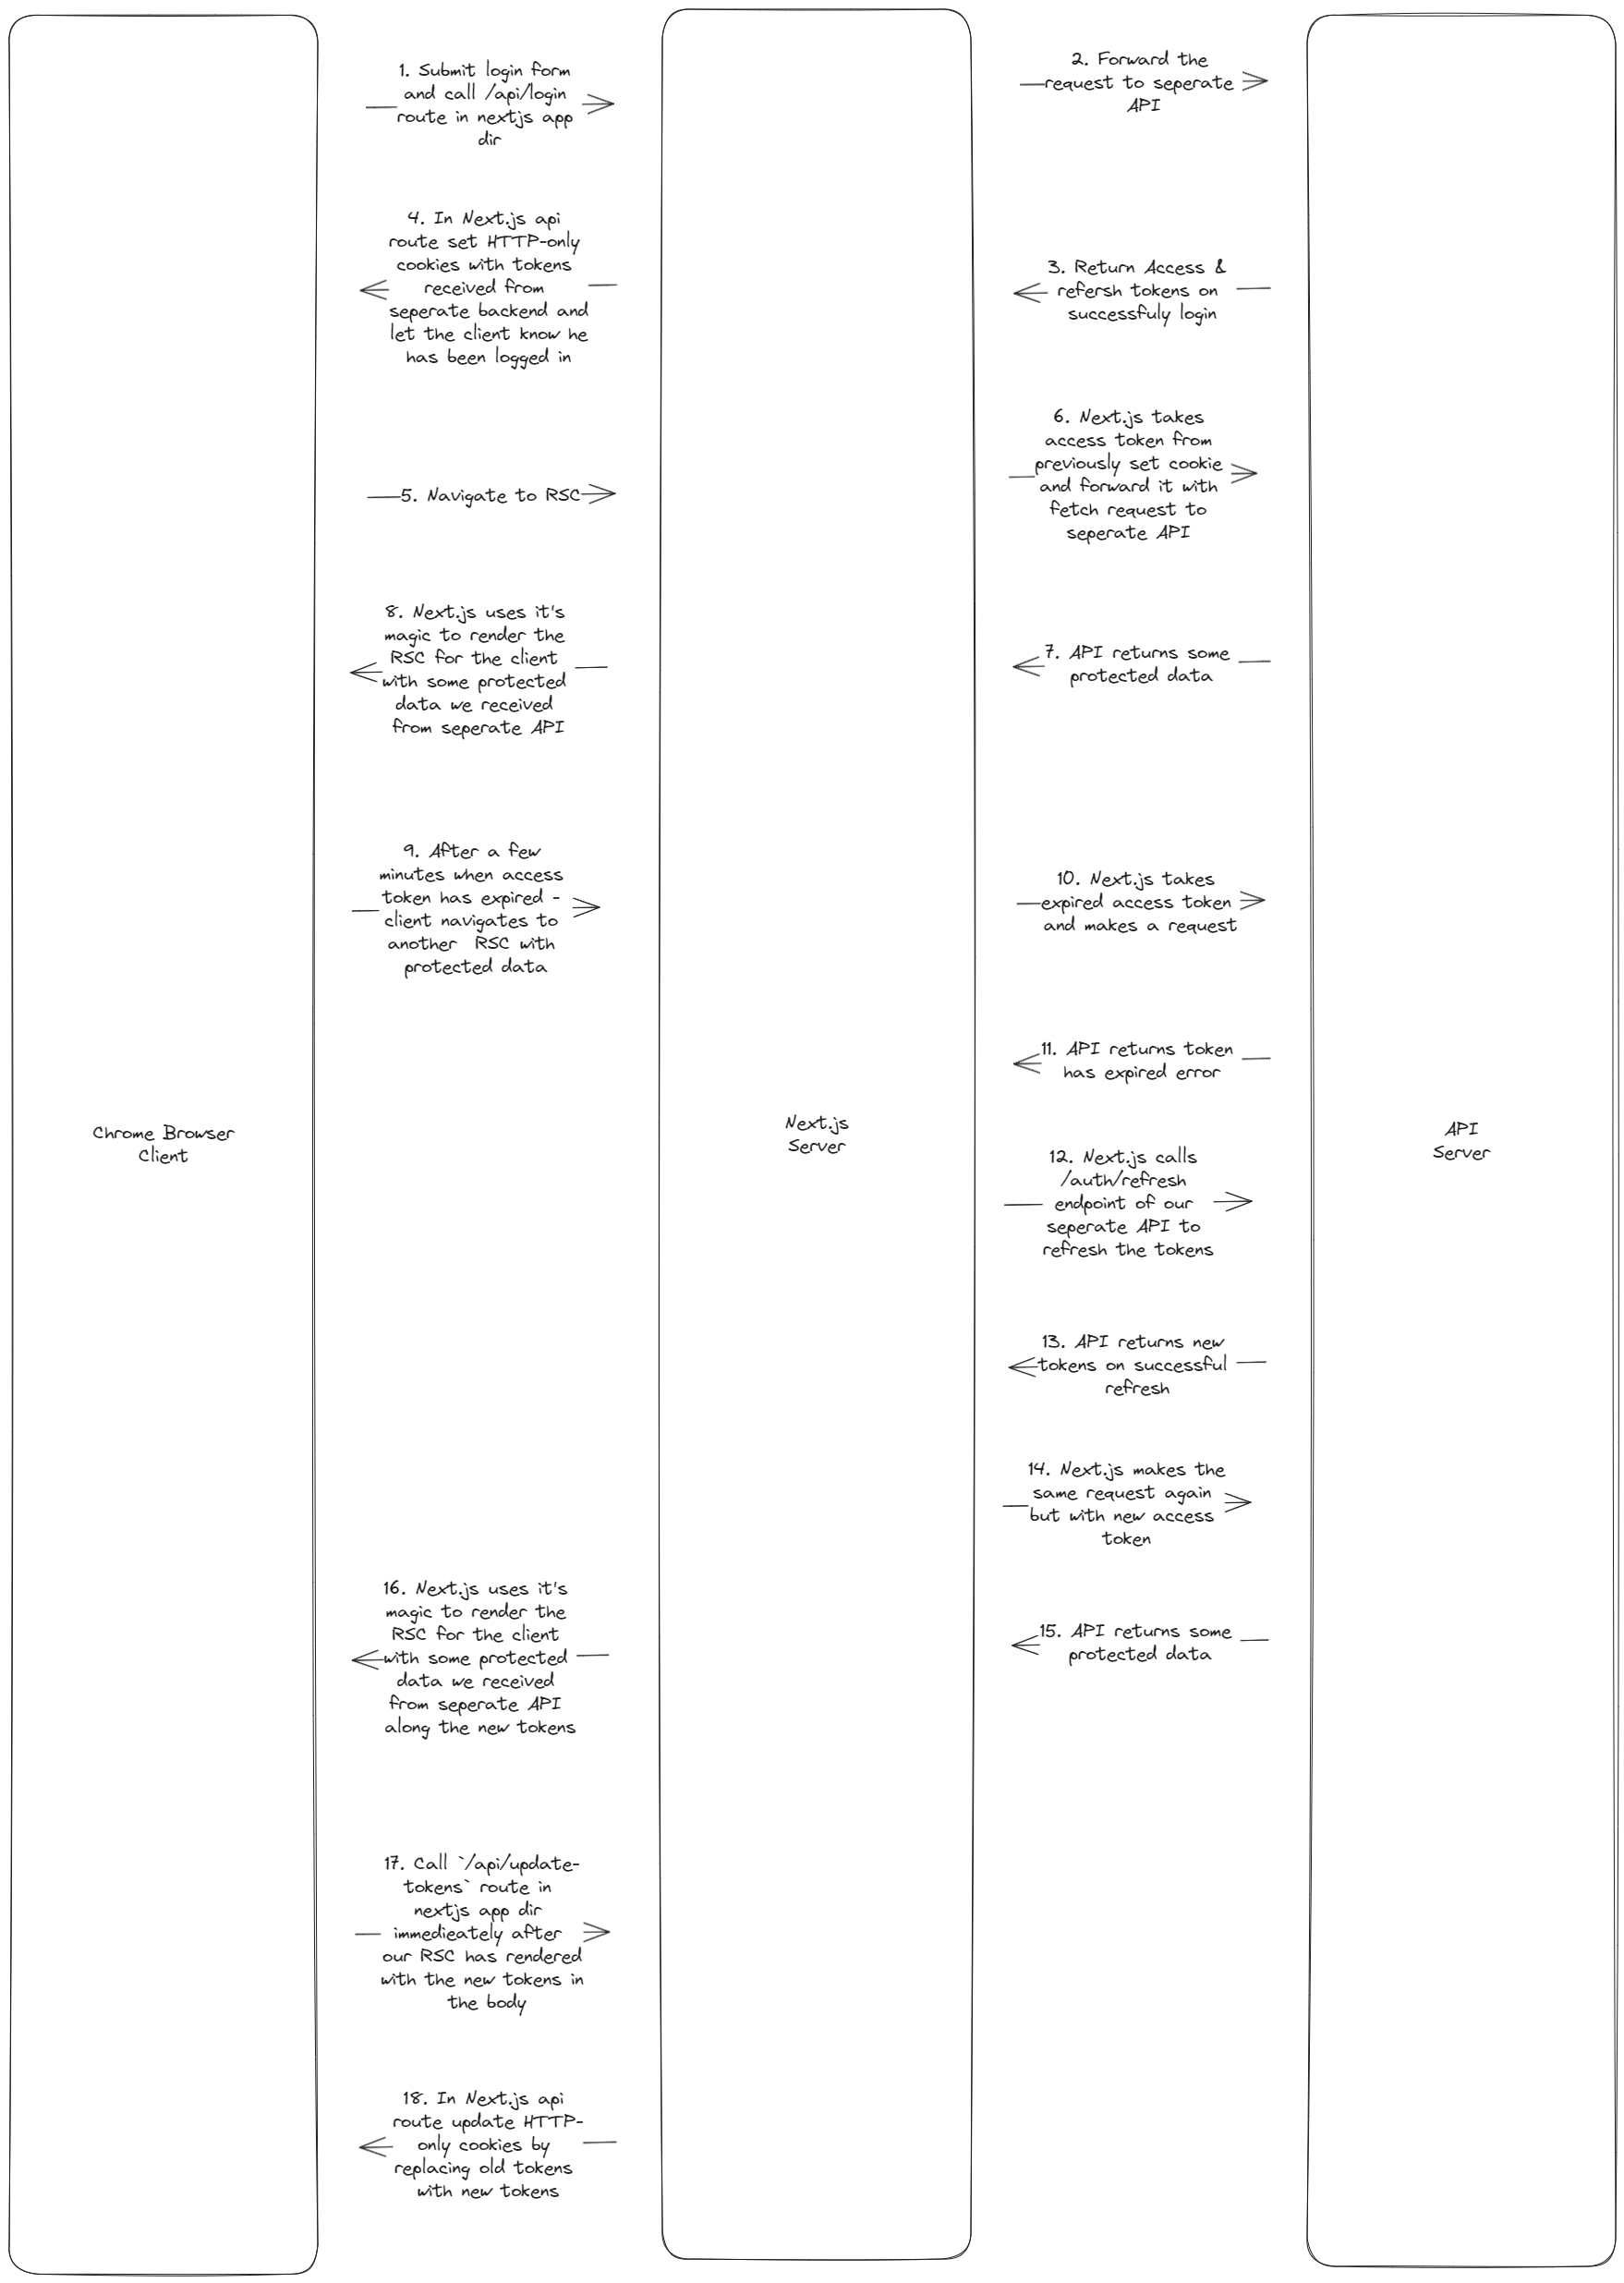
In step 16, we make an adjustment. Instead of returning just the protected data in the React Server Component (RSC), we also include the new tokens. Once the component is rendered on the client side, a request is initiated from the client's browser to our Next.js API Route Handler, containing the new tokens in the request body. The Route Handler can then validate the tokens and update the existing ones in the HTTP-only cookies. It might sound a bit perplexing, so let's delve into a code example to clarify.
Protected RSC:
import { cookies } from 'next/headers';
import { redirect } from 'next/navigation';
import ServerSessionUpdater from '../components/ServerSessionUpdater';
import { serverFetch } from '../serverFetch';
import { decryptServerSession } from '../utils';

const ProtectedRSC = async () => {
  const sessionCookie = cookies().get('session');

  if (!sessionCookie) {
    // User is not authenticated
    return redirect('/login');
  }

  const serverSession = decryptServerSession(sessionCookie.value);

  if (!serverSession) {
    // Redirect user if decryption failed
    return redirect('/login');
  }

  const { response, encryptedSharedSession } = await serverFetch({
    input: 'http://localhost:8000/express-api/protected-route',
    init: {
      method: 'GET',
      headers: {
        // We could omit setting authorization header here beacause `authTokens` are passed into the `serverFetch` and could set the header depending if `authTokens` are passed or not
        authorization: `Bearer ${serverSession.accessToken}`,
      },
    },
    authTokens: {
      accessToken: serverSession.accessToken,
      refreshToken: serverSession.refreshToken,
    },
  });

  if (!response.ok) {
    if (response.status === 401) {
      // The token refresh process has failed
      return redirect('/login');
    }
  }

  const data = await response.json();

  return (
    <>
      <ServerSessionUpdater encryptedSharedSession={encryptedSharedSession} />
      <main>
        <h1>Proctected Server Page</h1>
        <div>Fetched data from express api: {JSON.stringify(data)}</div>
      </main>
    </>
  );
};

export default ProtectedRSC;
In the code above, the process is straightforward. In the React Server Component (RSC), we call a backend route using the serverFetch helper function. This helper function is essentially a wrapper around the fetch function, which also handles token refresh if the initial request returns a 401 error. It reissues the original request with the new access token.
You might notice something unusual in the JSX of this RSC – a component called ServerSessionUpdater. Let's take a closer look at it.
ServerSessionUpdater Component:
'use client';
import { useEffect, useRef } from 'react';

type ServerSessionUpdaterProps = {
  encryptedSharedSession?: string;
};

const ServerSessionUpdater = ({ encryptedSharedSession }: ServerSessionUpdaterProps) => {
  const initialized = useRef(false);

  const handleTokenRefreshInNext = async () => {
    const fetchResponse = await fetch('/api/nextjs-update-server-session', {
      method: 'POST',
      headers: {
        'Content-Type': 'application/json',
      },
      body: JSON.stringify({ encryptedSharedSession }),
    });

    if (!fetchResponse.ok) {
      console.log('Failed refreshing the token.');
    }
  };

  useEffect(() => {
    if (!encryptedSharedSession) {
      return;
    }

    if (initialized.current) {
      return;
    }

    handleTokenRefreshInNext();
    initialized.current = true;
  }, []);

  return null;
};

export default ServerSessionUpdater;
This component appears to return null, which may seem odd. However, ServerSessionUpdater plays a vital role in updating our tokens in the cookie for the Next.js server. Remember, we can only set or update cookies in Server Actions or Route Handlers. This component essentially handles step 17 of the diagram mentioned earlier.
Lastly, let's explore the Route Handler/API Route:
API Route (Route Handler):
import jwtDecode from 'jwt-decode';
import { NextRequest, NextResponse } from 'next/server';
import { cookies } from 'next/headers';
import { decryptSharedSession, encryptServerSession } from '@/app/utils';

export const POST = async (request: NextRequest) => {
  let data;

  try {
    data = await request.json();

    const sharedSession = decryptSharedSession(data.encryptedSharedSession);

    if (!sharedSession) {
      return NextResponse.json(
        { message: 'An error occurred while trying to decrypt provided session data.' },
        { status: 400 }
      );
    }

    const refreshTokenPayload = jwtDecode<any>(sharedSession.refreshToken);

    // Here we could also verify that the session has correct data before getting it ready for the server
    const encryptedServerSession = encryptServerSession(sharedSession);

    cookies().set({
      name: 'session',
      value: encryptedServerSession,
      httpOnly: true,
      expires: new Date(refreshTokenPayload.exp * 1000),
      sameSite: 'lax',
      secure: true,
    });

    return NextResponse.json(sharedSession, { status: 200 });
  } catch (e: unknown) {
    return NextResponse.json({ message: 'An unknown error occurred.' }, { status: 500 });
  }
};
This route's functionality is straightforward – it retrieves the new tokens and user information from the request body, performs some validation, and updates the cookies. Additionally, there's some extra encryption and decryption involved for enhanced security.
This mechanism ensures that the tokens get updated in the cookies, addressing the challenges presented by Next.js 13's limitations on cookie management within React Server Components.
Conclusion
As you've seen, dealing with Next.js "quirks" can be complex and a bit of a hassle. In my opinion, if you have the flexibility to move both your frontend and backend to Next.js, it can make your work more straightforward and enjoyable. But if that's not an option, the approach discussed here provides a way to explore how things might work.
Please remember that this article is just an exploration of options for handling refresh tokens and isn't intended for actual production use.